OAuth 2 has recently become the web standard for authenticating APIs for use in custom applications. As a user you have probably seen it any time you try to install an application that works with Facebook, Github or any number of others. Infusionsoft has adopted the OAuth 2 standard and is slowly pushing us to use it in lieu of the more simple API key authentication. So what is OAuth 2 and how does it work? And more importantly, how do you set up an Infusionsoft OAuth API connection?
What is OAuth 2?
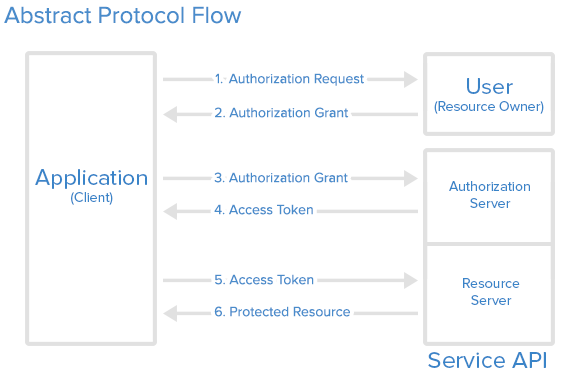
OAuth 2 is a standard protocol for authentication which can be set up by a web service in order to provide access to their data. The protocol essentially defines the following 3 types of players or roles which will interact together.
- Resource Owner – The resource owner is essentially going to be the end user who will be the one to authenticate the application. For Infusionsoft, this translates to a User in Infusionsoft. The authentication will ultimately be done by the User or by someone on behalf of the User.
- Client – The client is going to be the application that is set up to connect with Infusionsoft in a more generic sense. The resource owner will essentially be authenticating the client to be able to talk with their Infusionsoft installation. The client can also have a server which securely stores the resource owner’s access tokens for continual use of the API without the need for re-authentication.
- Resource Server/Authentication Server – The resource server is where the user account information is stored, while the authentication server is where the access details are stored in order to for the client to connect with the resource server. Essentially, Infusionsoft itelf is the resource server, and the OAuth API is the Authentication Server. From the developers point of view, these are both the same.
How Does It Work?
The OAuth 2 protocol has standard flow, which follows the procedure below:

- Developer registers their application (client) with the resource server. This is usually done with a client_id and client_secret. Once the developer sets this up, they will use those details to communicate with the resource server in order to set up an authentication process for the user to follow.
- The application first will send the user to an authorization request using its client_id and/or client_secret.
- The user will be asked to login to their resource (Infusionsoft) in order to grant permission for the application to use their resource data. This only needs to be done once as the application can then store the token for subsequent requests.
- When the user grants permission for the application to use their resource, a grant code is sent to a url that the application would have specified when sending in the client_id and/or client_secret.
- When the application (via the url from above) is sent a grant code, that code is then used to generate an access_token. The application does this by making a request to the authentication server with the client_id, client_secret, and grant code. Assuming that those credentials are valid, the authentication server will then return an access_token that will be used to connect directly with the resource server.
- When the application has received the access_token, it will store it in its database (encrypted) for later use. Usually an access_token will only be valid for a certain period of time and therefore sometimes comes with a refresh_token which can be used to get a new access_token. The refresh_token should be stored along with the access_token.
- The application is now free to connect with the resource server and do whatever is intended. Every call made to the resource server will require the access token.
How do I set up an Infusionsoft OAuth API connection
So now that you understand how OAuth 2 works in general, (simple right?) what is the procedure for setting it up for Infusionsoft?
Essentially an Infusionsoft OAuth 2 connection can be set up in any language, but they have provided a wrapper for use with PHP to simplify the process as well as make xml-rpc calls more simple and readable. You can install the PHP SDK from composer or download it directly from github at https://github.com/infusionsoft/infusionsoft-php. The link also provides more documentation on how to use the SDK.
Essentially there are 3 steps in Authenticating the application.
- Send the user to Infusionsoft to Authorize the application.
require_once 'vendor/autoload.php'; $infusionsoft = new \Infusionsoft\Infusionsoft(array( 'clientId' => 'XXXXXXXXXXXXXXXXXXXXXXXX', 'clientSecret' => 'XXXXXXXXXX', 'redirectUri' => 'http://myapplicationurl.com/myapplicationauthorizationscript.php' )); echo 'Click here to authorize;'; - Accept the grant back from Infusionsoft after the user has logged in an granted permission.
require_once 'vendor/autoload.php'; $infusionsoft = new \Infusionsoft\Infusionsoft(array( 'clientId' => 'XXXXXXXXXXXXXXXXXXXXXXXX', 'clientSecret' => 'XXXXXXXXXX' )); /** * This will send the grant code to Infusionsoft and return an access token * expiration, and refresh token that you can store in your database. It will also * set the token for you so that you are ready to make calls to the API. */ $infusionsoft->requestAccessToken($_GET['code']); // you should encrypt this array after you serialize it for security. $token_array = serialize($infusionsoft->getToken()); // store $token_array somewhere and/or begin making API calls - Get the token from the database and set it for making calls to the API
require_once 'vendor/autoload.php';

// Decrypt and unserialize the token object from your database
$token_array = some_method_for_retrieving_and_unserializing_token();

// Set up your Infusionsoft object.
$infusionsoft = new \Infusionsoft\Infusionsoft(array(
    'clientId'     => 'XXXXXXXXXXXXXXXXXXXXXXXX',
    'clientSecret' => 'XXXXXXXXXX'
));

// Set the token
$infusionsoft->setToken($token_array);

// Now you are ready to make calls to the API
And that’s it! Now you are ready to start building an application that connects to Infusionsoft via the API.


