Introduction To PHP and the Infusionsoft API
This session covered:
- Loops
- For Loops
- While Loops
- Do … While
- Foreach loops
- Break and Continue
- Using loops with Infusionsoft API calls like dsQuery
We Integrate Systems
This session covered:
This session covered PHP strings:
This session covered PHP dates and time:
This session covered using functions with the Infusionsoft API and error handling:
1) Purchase and install the Gravity Forms Developer License and activate the Signature Add-On.
DISCLAIMER: The purchase link for Gravity Forms is an affiliate link. If you click it and then buy, we earn enough to put some Diet Dr. Pepper in the fridge.
2) Download and install the URL-Params plugin from the WordPress plugin repository. All you have to do with this one is install it and Activate it.
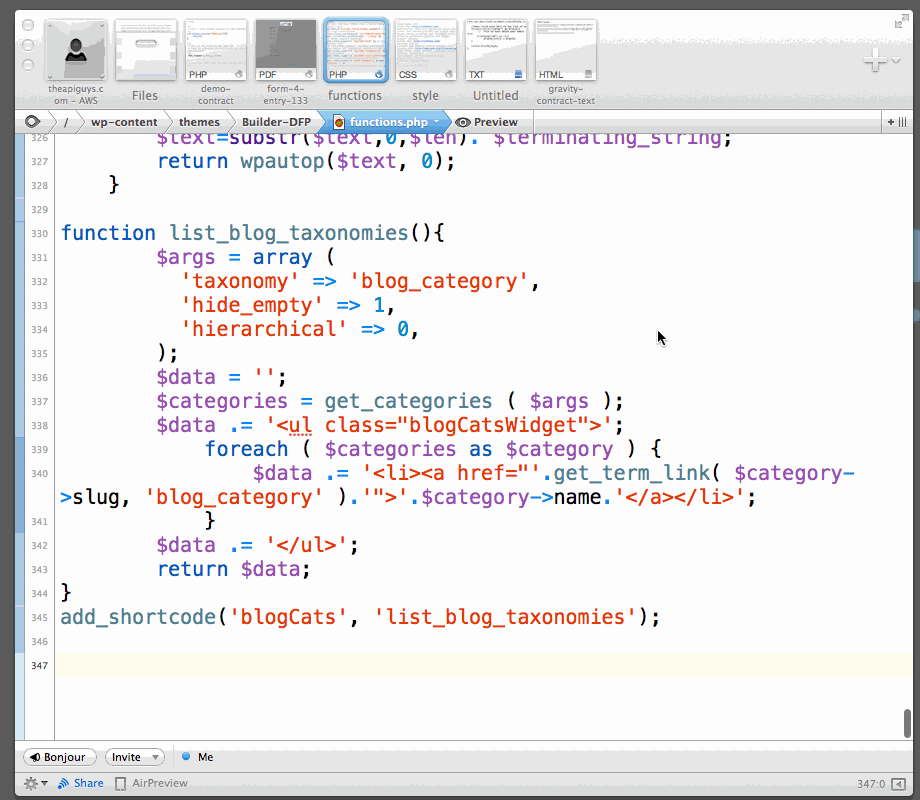
3) Next, we are going to add a snippet of code, called the gform_email_fields_notification_admin hook to your functions.php file in your WordPress theme directory.
Using FTP, navigate to your theme folder. It will be located in a sub folder of your web site directory, (often called www or public_html.) The path will be /wp-contents/themes/YOUR_THEME. This is what it looks like on my server:

add_filter("gform_email_fields_notification_admin", 'add_field_to_email_list', 10, 2);
function add_field_to_email_list($field_list, $form){

   //Adds field with ID=1 to the list of email fields
   foreach($form["fields"] as $field){
   //  This ID must match your email field on contract form
       if($field["id"] == "1")
       		$field_list[] = $field;
   }

   return $field_list;
}
Scroll to the bottom of your functions.php file and paste the code there. Be sure to Save.
NOTE: If you create a form, in the next step, that has an email field ID not equal to 1, you will need to come back to this file and update the line that says “if($field[“id”] == “1”)” by changing the number to the ID of your email field.
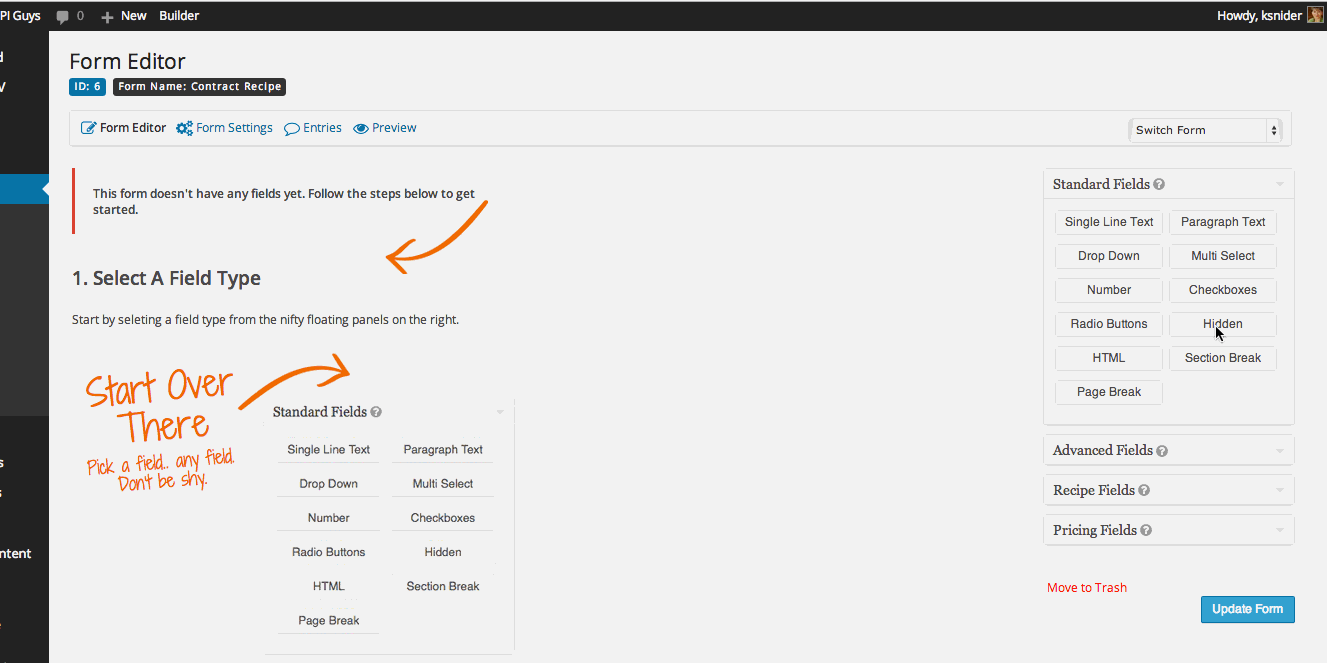
1) Create a new Gravity Form you will use for your new contract template.
2) The first thing you want to do, once you have the new form created, is go over the the right hand side of the Form Editor and click one time on the Hidden button.
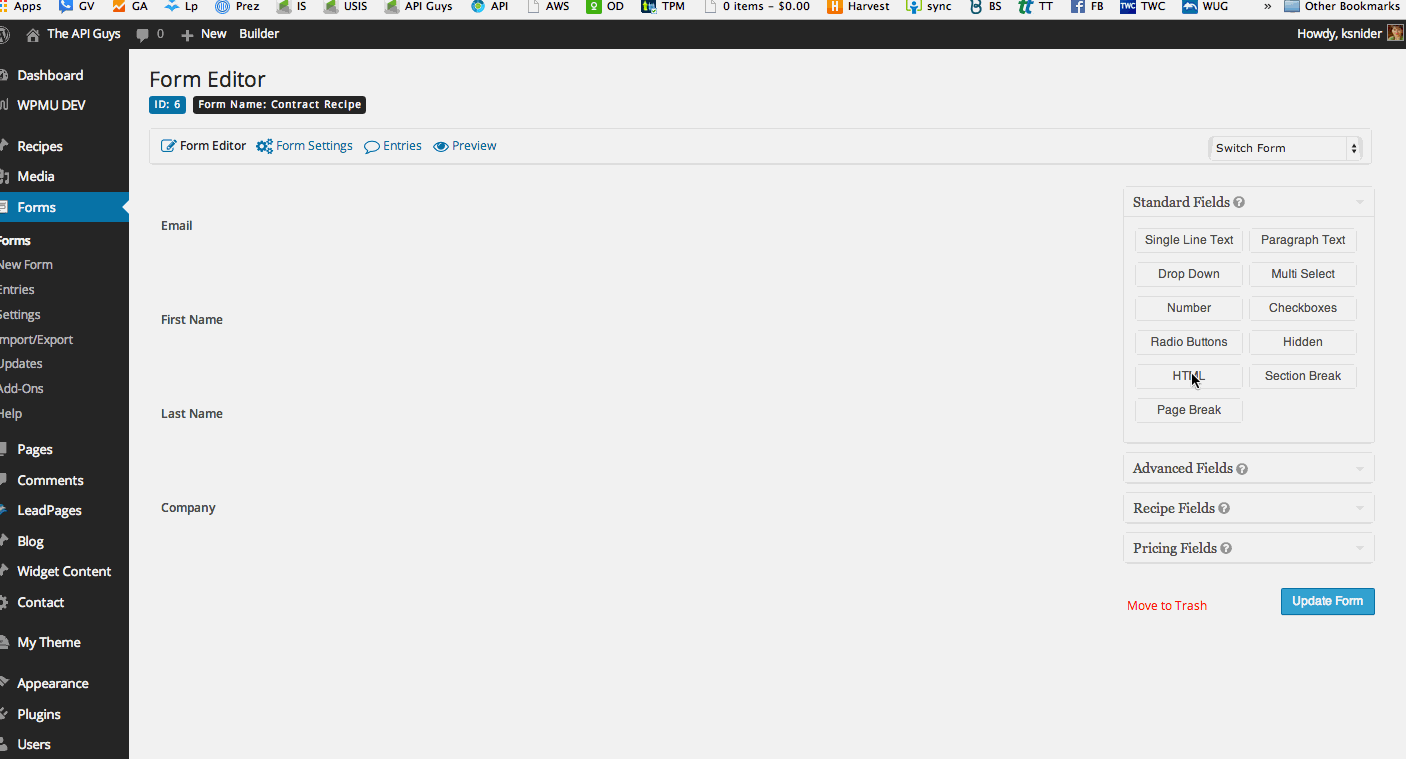
Rinse and repeat for each piece of dynamic data you will be sending from Infusionsoft to Gravity Forms to be included in the contract. In this case, we will use first name, last name, company and email address.
NOTE: For the parameter name of the dynamic field, you can use any name you want. However, it is best to keep it short because it will be passed in an email query string. Also, write down the parameter name you used because you will need it later.
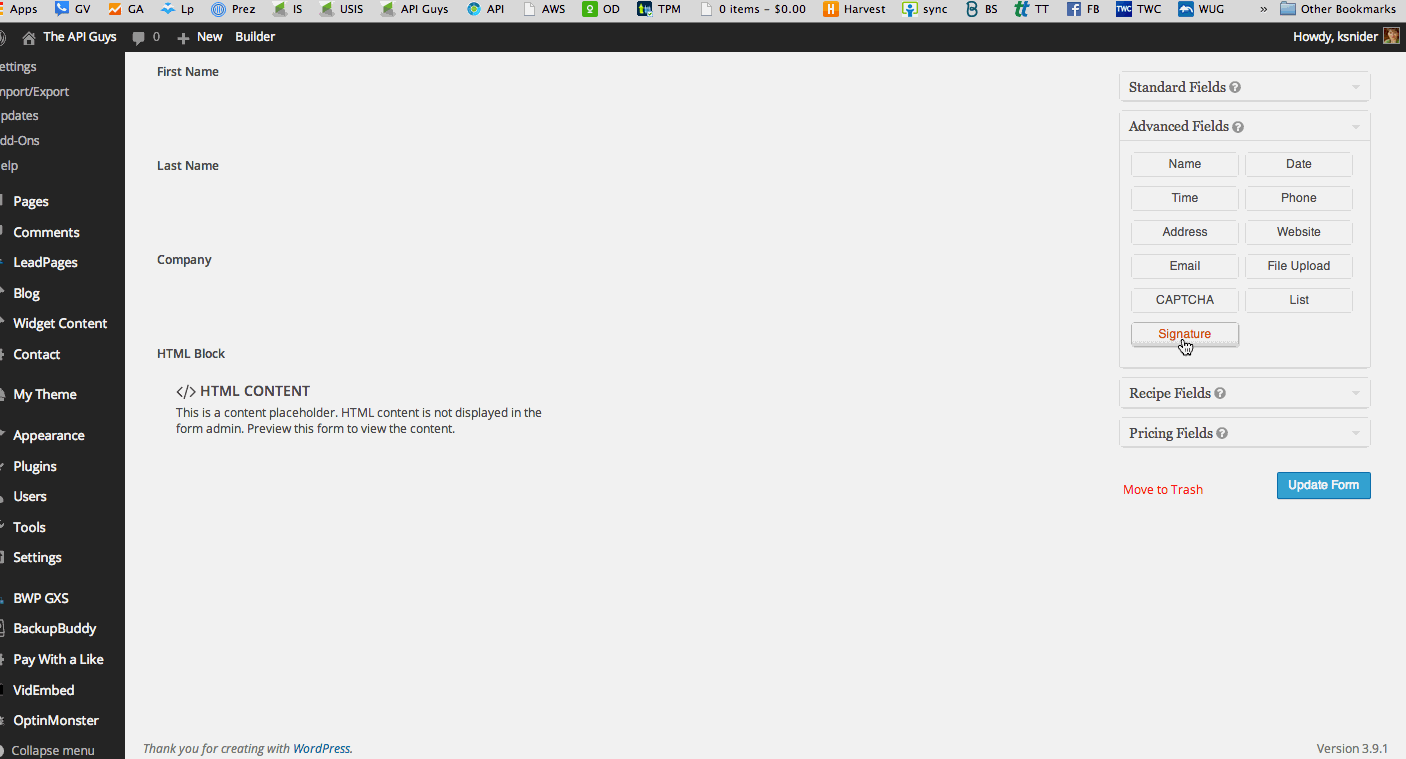
3) Add an HTML field for your contract text.
It may be helpful to use multiple HTML fields, for complex contract designs, to give you more control over the PDF template later.
In the HTML, you will substitute short codes for the dynamic data, like so:

Note that the parameters, in the shortcodes, MUST be the same as the parameters you used in the hidden fields and the query string in the Infusionsoft email we will construct in Step 5.
Finally, go to Advanced Fields and add a signature block.
4) Set up your Notifications – these will automatically include the signed PDF

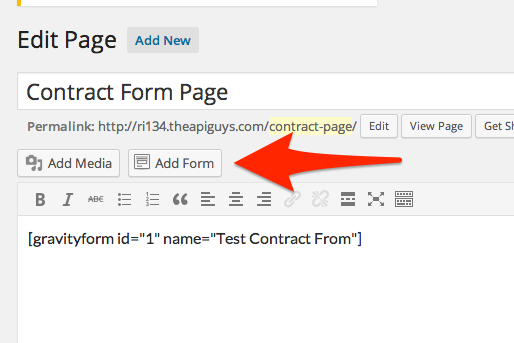
5) Add your form to a page or post
1) Download and install the Gravity Forms PDF Extended plugin from the WordPress plugin repository.
2) Modify configuration.php
$gf_pdf_config[] = array(
  	'form_id' => 1,    // This is the id of the Gravity Form you want to use
	'template' => 'default-template-no-style.php',
  	'save' => true,
  	'notifications' => array('Admin Notification', 'User Notification')
  );
Be sure to SAVE.
3) Fill out your contract form to create a form entry
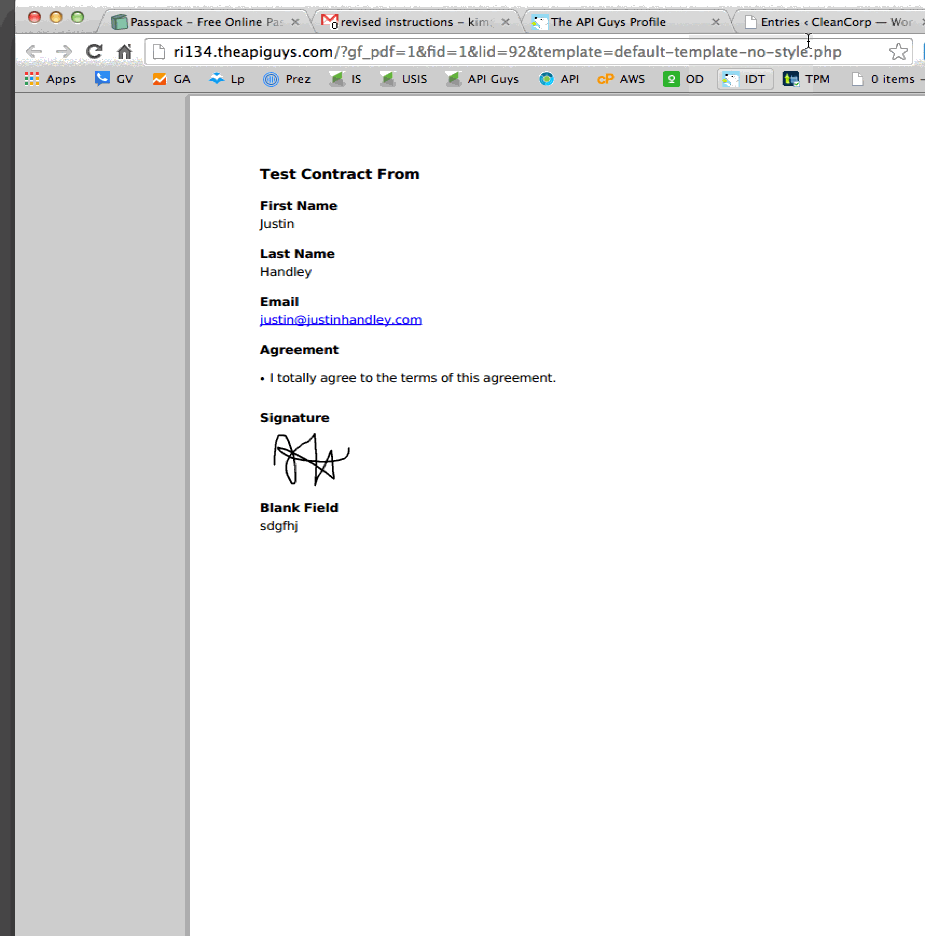
Note the data type (e.g.
or [field] or [signature]) and the array position number (for fields, this will be the same as the field number; for html fields it will start at [0]), for each piece of data you want to show on the pdf. Write them down for use further on.
4) Modify or create a template for your PDF
NOTE: You are creating two different versions of your contract. The first one was on the form that gets filled out. The second is the PDF output of the form. They can be the same or different. That is up to you. For purposes of this example, we will assume you want them to look roughly the same.
<?php echo $form_data['field'][17]; ?>
This pulls from Field number 17. Or, to pull from the first HTML Block on the form:
<?php echo $form_data['html'][0]; ?>
Again, to see the fields available and their IDs, just add “&data=1” to the URL of any PDF you are viewing that is based on an example template (like the one you are creating.)
NOTE: there are two ways to construct the form. One is the recreate all of the html in the template and insert the field values as shown above.
Another, which may be easier when your form is fairly simple, is to pull in the HTML block from the form, rather than duplicating the html here.
5) Adjust your configuration.php to point to the correct template
Go back to your configuration.php file in YOUR_WEBSITE_DIRECTORY/wp-contents/themes/YOUR_THEME/PDF_EXTENDED_TEMPLATES/configuration.php.
Modify the name of the template for each for you wish to turn into a PDF:
$gf_pdf_config[] = array(
  	'form_id' => 1,
	'template' => 'my-new-contract-template.php',
  	'save' => true,
  	'notifications' => array('Admin Notification', 'User Notification')
  );
SAVE and Close.
1) Download the PDF to Infusionsoft script. Unzip the file and place both of the unzipped files (infusionsoft-settings.php and pdf-to-infusionsoft.php) in a new folder called “pdf-to-infusionsoft”, inside the Plugins folder of your active theme (YOUR_WEBSITE_DIRECTORY/wp-contents/themes/YOUR_THEME/plugins/pdf-to-infusionsoft/…).
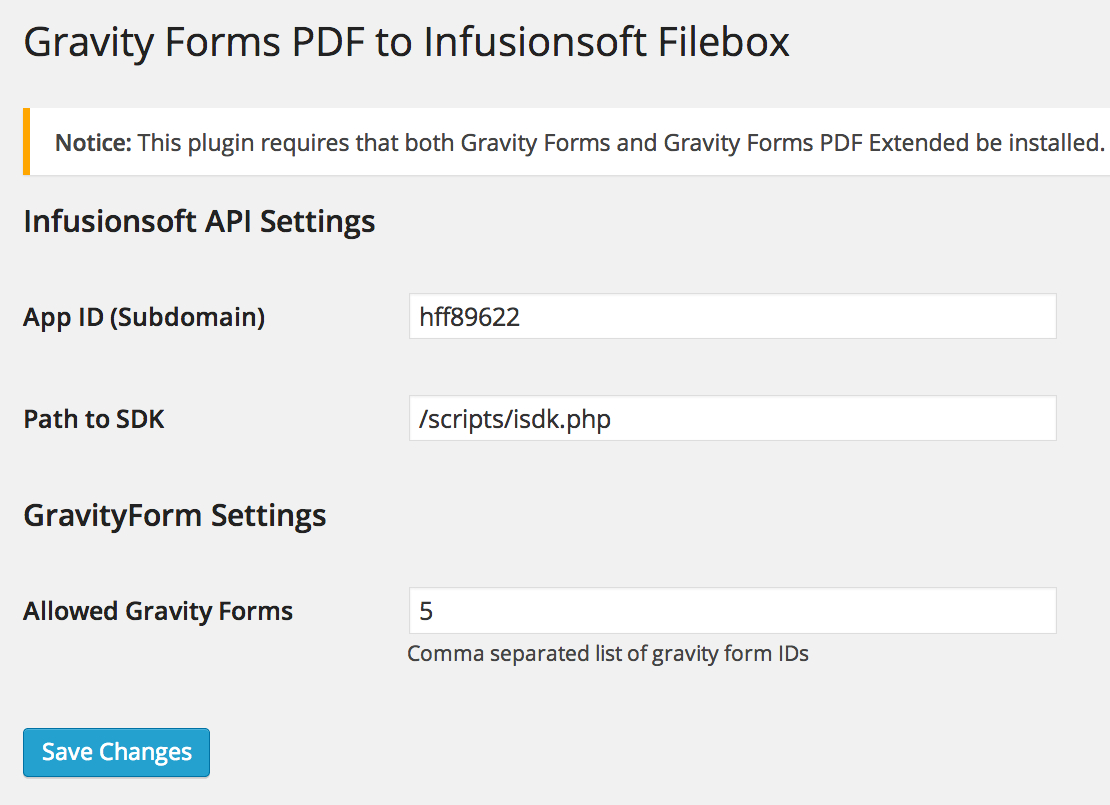
Add your app name and the path to the Infusionsoft SDK. This is the file(s) that connect to the Infusionsoft API. If you have not previously used the Infusionsoft API, you will have to set this up now, according to the instructions here.
Add the ID of any and all forms you want to send to Infusionsoft as PDFs.
1) Create a new automation link that includes all merge fields needed for the contract
Go to Marketing -> Settings -> Automation Links -> Automation Link -> Create Link
Give the link a name.
Construct a link like this:
http://theapiguys.com/contract-demo/?id=~Contact.Id~&company=~Contact.Company~&email=~Contact.Email~&first=~Contact.FirstName~&last=~Contact.LastName~ where the URL before the ? is the URL of the web site page where you added the Gravity Form contract in Step 2.5.
NOTE: Everything after the ? is known as a “query string” and it has a pattern of key=value separated by &’s. In this case, the key is the parameter name you put in the Gravity Form fields in Step 2.2. The key must match the parameter you chose in Step 2.2 for the data from Infusionsoft to pass to the Gravity Form contract. The value (the part after the =, is a standard Infusionsoft merge field.
Include as many key value pairs as necessary to pass all needed information from Infusionsoft to Gravity Forms
Change “What do you want the customer to see when they click this link?” to the link you just constructed.
Add Link Text as necessary and Save.
1) Send an email to yourself, from a contact record, containing your Contract Automation Link. Make sure your necessary merge fields have something in them.
2) Click the link from the email. It should:
3) Submit the form. It should:
If the email does not take you to the contract page on your website:
If the form doesn’t pass the data you included in the query string:
If the form doesn’t send notification emails:
If the notification email does not contain the PDF:
If the contact’s filebox does not contain the PDF: