Author: The AI Team

  • Tags On The Fly – Quickstart Guide

    [wc_accordion collapse=”1″ leaveopen=”0″ layout=”box”]

    [wc_accordion_section title=”Installing the Plug-In”]

    Installing the Plug-In

    Note: You should have installed your Infusionsoft Pocket Developer plug-in using the instructions provided, if for any reason you have not installed your Pocket Developer plug-in click here to learn how.
    [/wc_accordion_section]

    [wc_accordion_section title=”Configuring the HTTP Post Snippet”]

    Configuring the HTTP Post Snippet

    Note: You should have installed your Infusionsoft Pocket Developer plug-in using the instructions provided, if for any reason you have not installed your Pocket Developer plug-in click here to learn how.

    tags-on-the-fly-snippet

    [wc_box color=”inverse” text_align=”left”]
    WarningNOTE: Everything in an HTTP POST is case sensitive. That includes the URL, the parameters on the left and the field names on the right. If caPitaLizaTion is wrong, your post will not work.
    [/wc_box]


    URL:

    The URL, on your server, where the Pocket Developer script is stored. For example:
    http://yourdomain.com/scripts/PocketDeveloper/Blocks/TagsFly/index.php

    Required Name Value/Pairs

    category

    • The name of the tag category to be used in association with the specified tag.
    • The tag category will be created if it doesn’t already exist.


    name

    • The name of the tag to be applied to the current contact record.
    • The tag will be created if it doesn’t already exist.

    contactId

    • This is the contact Id for the contact record where fields will be retrieved (if any) and where the result of the counter iteration will be stored

    Optional Name Value Pairs:

    • overrideAny contact ID to be used in override scenarios. Overriding creates an accessor to another contact’s data, other than the data associated with the current contact.
      To utilize override data, use Override.Field or ~Override.Field~ notation in plac of the traditional Contact.Field or ~Contact.Field~ notation

    [/wc_accordion_section]
    [wc_accordion_section title=”Demo Video”]

    Demo Video


    [/wc_accordion_section]
    [wc_accordion_section title=”Pro Tips”]

    Pro Tips

    [/wc_accordion_section]

    [wc_accordion_section title=”Frequently Asked Questions”]

    Frequently Asked Questions

    [/wc_accordion_section]
    [/wc_accordion]

  • How To Create Totally Dynamic GoToWebinar Infusionsoft Campaign

    Webinar Replay

    GoToWebinar is a powerful tool for generating leads, converting prospects to customers and delivering your content in an engaging way.

    Infusionsoft is also a powerful tool for generating leads, converting prospects to customers and delivering your content in an engaging way.

    But most people are not using Infusionsoft to fully manage their GoToWebinars.

    Or, if they are, they are only kind of, sort of integrated and still require lots of changing and setting up of dates, timers, tags, handout and replay links.

    Either way, you are not maximizing sign-ups, attendance and conversion. And you are either tarnishing your brand using those terrible GoToWebinar emails and forms or wasting time managing a campaign.

    WHAT YOU WILL LEARN:

    1. I will give you the pros and cons of managing a webinar within Infusionsoft Campaign Builder
    2. I will show you the limitations of most GoToWebinar integrations
    3. I will show you how to build a completely dynamic GoToWebinar campaign including sending one-hour reminders/texts without hard-coding the time, automated set-up of your tags as part of the campaign, dynamic handout and replay links and automated attendance for webinar series.

  • Counter – Quickstart Guide

    [wc_accordion collapse=”1″ leaveopen=”0″ layout=”box”]

    [wc_accordion_section title=”Installing the Plug-In”]

    Installing the Plug-In

    You should have installed your Infusionsoft Pocket Developer plug-in using the instructions provided, if for any reason you have not installed your Pocket Developer plug-in click here to learn how.
    [/wc_accordion_section]

    [wc_accordion_section title=”Configuring the HTTP Post Snippet”]

    Configuring the HTTP Post Snippet

    counter

    [wc_box color=”inverse” text_align=”left”]
    WarningNOTE: Everything in an HTTP POST is case sensitive. That includes the URL, the parameters on the left and the field names on the right. If caPitaLizaTion is wrong, your post will not work.
    [/wc_box]

    URL:

    The URL, on your server, where the Pocket Developer script is stored. For example:
    http://yourdomain.com/scripts/PocketDeveloper/Blocks/TagsFly/tagsfly.php

    Required Name /Value Pairs:

    field

    • This is the field whose value will be modified by the counter action, such as _MyField or Contact._CustomField1. Field name should have no merge-field tilde characters

    direction

    • The direction with which the counter should iterate. The only values supported are: ‘up’, ‘down’, ‘add’, ‘subtract’, ‘increment’, ‘decrement’, ‘increase’, and ‘decrease’

    amount

    • The amount of change of the counter iteration. Generally, this should be some positive numeric value, such as 3, 10, 7.6, etc.

    contactId

    • This is the contact Id for the contact record where fields will be retrieved (if any) and where the result of the counter iteration will be stored

    Optional Name Value/Pairs:

    request

    • This is a URL to query at the end of the operation. The merge field {result} can be placed anywhere within the URL to include the result of the operation, allowing you to pass the value to another script

    [/wc_accordion_section]

    [wc_accordion_section title=”Demo Video”]

    Demo Video

    [/wc_accordion_section]

    [wc_accordion_section title=”Pro Tips”]

    Pro Tips

    [/wc_accordion_section]

    [wc_accordion_section title=”Frequently Asked Questions”]

    Frequently Asked Questions

    [/wc_accordion_section]
    [/wc_accordion]


  • How To Automatically Change Opportunity Stage in Infusionsoft Campaign Builder

    Webinar Replay

    When you open Campaign Builder, Infusionsoft, how often do you run into a challenge?

    At The API Guys, we do custom development for clients. We found ourselves running into the same roadblocks over and over again.

    You know the mantra, right? “If you do something more than three times, automate it!”

    So we built ourselves these small blocks of code, reusable in every app, by all of our people, not just the programmers, in a million different ways, without touching the code.

    We built bunches of these blocks. They save us lots of time … and time is money, especially in the development business.

    So then we thought … I bet everyone would like to have these handy little Infusionsoft plug-ins.

    So, we created an Infusionsoft code vending machine! One that spit out our reusable, pre-made, plug-ins … and installed them on your server for you … Almost instantly!

    We call it Pocket Developer

    So now, everyone can solve these same problems, using Pocket Developer, without knowing code.

    When you open Campaign Builder, Infusionsoft, how often do you run into a challenge?
     

    AtThe API Guys, we docustom developmentfor clients. We found ourselves running into the same roadblocks over and over again.

     
    You know the mantra, right? “If you do something more than three times, automate it!”
     
    So we built ourselves these small blocks of code, reusable in every app, by all of our people, not just the programmers, in a million different ways, without touching the code. 
     

    We built bunches of these blocks. They save us lots of time … and time is money, especially in the development business.


    So then we thought … I bet everyone would like to have these handy little Infusionsoft plug-ins.


    So, we created an Infusionsoft code vending machine! One that spit out our reusable, pre-made, plug-ins … and installed them on your server for you … Almost instantly!


    We call it Pocket Developer


    So now, everyone can solve these same problems, usingPocket Developer, without knowing code. 


    HERE IS AN EXAMPLE:

    One of the things we are often asked to code for people is an Opportunity Stage Move, right from Campaign Builder. This is not something you can do in Campaign Builder out-of-the-box.
     
    But there is no need to pay me or any developer to do a stage move from Campaign Builder. This video shows you how.

    WHAT YOU WILL LEARN: 

    1. I will explain the pros and cons of using an Opportunity in a Campaign. I will also cover what else you can use them for, besides sales pipelines.

    2. I will show you how to change the stage of any opportunity, from Campaign Builder, without hiring an expensive developer, using theOpportunity Stage Move plug-in, from Pocket Developer.

    3. *** I will show you how to choose a single opportunity to move, from among many opportunities on that same contact *** 

    4. I will take any and all questions, in the Q&A, about how to do anything you can’t figure out how to do in Infusionsoft. I love solving tough Infusionsoft puzzles.

    POCKET DEVELOPER TAKES THE GRRR! OUT OF CAMPAIGN BUILDER:

    If you haven’t seen it, Pocket Developer is as easy as a WordPress plug-in and powerful as a high-priced developer. It is an Infusionsoft game-changer, in five ways:

    1. You can now access, update and merge data stored in Opportunities, Appointments, Tasks, Orders, Invoices, Referrals, Tag Descriptions and more

    2. You can now access, update and merge data stored in Contacts other than the one going through the campaign

    3. You can now delay and resume campaigns, using any increment or description of time (e.g. one hour before {Contact._ApptTime})

    4. You can now get creative with new goal scenarios for New Contact Created, New Opportunity Created, New Appointment, New Task, New Invoice, etc.

    5. You can reuse Pocket Developer Infusionsoft plug-ins over and over, in as many apps as you want. Pocket Developer is a one time-fee, hosted on your server and completely open source. 

    Here Is An Example:

    One of the things we are often asked to code for people is an Opportunity Stage Move, right from Campaign Builder. This is not something you can do in Campaign Builder out-of-the-box.

    But there is no need to pay me or any developer to do a stage move from Campaign Builder. This video shows you how.

    What You Will Learn:

    1. I will explain the pros and cons of using an Opportunity in a Campaign. I will also cover what else you can use them for, besides sales pipelines.

    2. I will show you how to change the stage of any opportunity, from Campaign Builder, without hiring an expensive developer, using the Opportunity Stage Move plug-in, from Pocket Developer.

    3. *** I will show you how to choose a single opportunity to move, from among many opportunities on that same contact ***

    4. I will take any and all questions, in the Q&A, about how to do anything you can’t figure out how to do in Infusionsoft. I love solving tough Infusionsoft puzzles.

    Pocket Developer Takes The Grrrrr! Out Of Campaign Builder:

    If you haven’t seen it, Pocket Developer is as easy as a WordPress plug-in and powerful as a high-priced developer. It is an Infusionsoft game-changer, in five ways:

    1. You can now access, update and merge data stored in Opportunities, Appointments, Tasks, Orders, Invoices, Referrals, Tag Descriptions and more

    2. You can now access, update and merge data stored in Contacts other than the one going through the campaign

    3. You can now delay and resume campaigns, using any increment or description of time (e.g. one hour before {Contact._ApptTime})

    4. You can now get creative with new goal scenarios for New Contact Created, New Opportunity Created, New Appointment, New Task, New Invoice, etc.

    5. You can reuse Pocket Developer Infusionsoft plug-ins over and over, in as many apps as you want. Pocket Developer is a one time-fee, hosted on your server and completely open source.

  • Custom Delay Timer – Quickstart Guide

    [wc_accordion collapse=”1″ leaveopen=”0″ layout=”box”]

    [wc_accordion_section title=”Installing the Plug-In”]

    Installing the Plug-In

    If, for any reason, you have not installed your Pocket Developer plug-in, follow these simple instructions, to learn how.
    [/wc_accordion_section]

    [wc_accordion_section title=”Configuring the HTTP Post Snippet”]

    Configuring the HTTP Post Snippet

    1. In the campaign sequence, add an HTTP Post snippet at the end of a sequence, where you want the delay to occur.

    sequence

    2. Open the HTTP Post snippet and configure as follows:

    name_value_pairs

    [wc_box color=”inverse” text_align=”left”]
    WarningNOTE: Everything in an HTTP POST is case sensitive. That includes the URL, the parameters on the left and the field names on the right. If caPitaLizaTion is wrong, your post will not work.
    [/wc_box]


    • URL: http://yoursite.com/scripts/PocketDeveloper/Blocks/CustomDelay/customdelay.php
    • contactId => ~contact.Id~ (do not change)
    • callName => add a name that is unique to this Delay Snippet e.g., PDWakeUp23521
    • delayFor => number of seconds you want to delay

    NOTES: Remember, Name/Value pairs are case-sensitive. If you put the same callName in multiple places, even in multiple campaigns, you could get unintended consequences!

    3. Copy the name you created for callName and close the HTTP Post snippet. Custom Delay Timer POST snippets should always be the last thing in that sequence
    [/wc_accordion_section]

    [wc_accordion_section title=”Configuring the The API Goal”]

    Configuring the API Goal

    4. Drag out any Goal from the Toolbox. Give it a name, like Wake Up or Resume Sequence.

    5. Double click the meta icon in the lower left corner of the goal. Change the Goal type to API Call Made (last one in the drop-down)

    api_call

    6. Configure the Goal as follows:

    • Integration => your Infusionsoft app name
    • Call Name => name you used and copied from the HTTP POST Snippet, e.g. PDWakeUp23521

    config_api

    7. Connect the Sequence containing the Delay Snippet (the one with the HTTP POST calling /customdelay.php) to the API Goal you just created.

    8. Then connect the API Goal to a sequence containing whatever you want to happen after the delay. Continue your Campaign as normal.

    connection
    [/wc_accordion_section]

    [wc_accordion_section title=”Demo Video”]

    Demo Video


    [/wc_accordion_section]
    [/wc_accordion]

  • Create a Dynamic Go-To-Webinar Integration Campaign

    CHALLENGE:

    GoToWebinar Campaign

    You run webinars all the time. You want to:
    1. Have attendees see only your branded forms and emails, not those ugly GoToWebinar ones
    2. Not have to manually set up all the merge fields and tags every time you run a new webinar
    3. Send reminders one hour before and at the start of the webinar without hard coding the dates and times
    4. Have attendance marked and tagged automatically
    5. Optional: Have attendance marked and tagged automatically for a webinar series

    SOLUTION:

    All of these things take time and time is your most precious asset. Why pay someone to do this over and over again when you can create this campaign, set it and forget it?

    This tutorial and accompanying video gives you the step-by-step to create a dynamic, Go To Webinar integration with Infusionsoft, which showcases six different Pocket Developer plug-ins: Any Text Anywhere, Any Date, Any Format, Anywhere, Universal Delay Timer, Custom Delay Timer, Tags On The Fly and the GoToWebinar Integration.

    [wc_box color=”go” text_align=”left”]

    time-64x100Don’t want to set this up yourself? Let one of our concierges do it for you. Just purchase all the necessary blocks. Then email concierge@theapiguys.com. We will have it all set up for you in a jif.
    [/wc_box]

    STEP-BY-STEP

    1. In Campaign Builder, create the following:

    Dynamic Go-To-Webinar Integration Campaign

    • a sequence named “Register in GTW”
    • an API goal named “PDWakeUp1dfg”
    • a sequence named “Add Webinar merge fields”
    • a sequence named “Send confirmation Email”
    • an API goal named “PDResumedhs3d”
    • a sequence named “Send one hour reminder”
    • an API goal named “PDResumeSew22”
    • a sequence named “Send reminder at start time”
    • an API goal named “PDResumeD6ts”
    • a sequence named “Mark Attendance and Set
      Webinar Replay Link field”
    • two tag goals – both connected to the previous sequence – named “Attended Tag” and “Did Not Attend Tag”
    • connect a sequence named “Attended Emails and Tags On The Fly” to the Attended Tag goal
    • connect a sequence named “Did Not Attend Emails and Tags On The Fly” to the Did Not Attend Tag goal
    • connect the two previous sequences to a single sequence named “Remove Attended/Did Not Tags and Wipe Stash Field”

    2. In the sequence named “Register in GTW”, create the following:

    Register in GoToWebinar sequence

    • Configure an HTTP POST snippet named “Pocket Developer GTW block” as follows:

    Pocket Developer GTW blockPocket Developer GTW block

    • POST URL => https://tag-2025.local/scripts/PocketDeveloper/Blocks/GoToWebinar/gotowebinar.php
    • contactId => ~Contact.Id~ (you shouldn’t need to change this)
    • action => register
    • webinar => 4762872526542099714
    • saveTitleTo => Contact._WebinarTitle
    • saveDateTo => Contact._YourWebinarDate0
    • saveJoinUrlTo => Contact._WebinarJoinURL

    [wc_box color=”info” text_align=”left”]

    about-128This assumes you have already installed and configured the GoToWebinar plug-in and created the webinar. The number in webinar is the GoToWebinar webinar ID and the action tells it to register this person.
    [/wc_box]

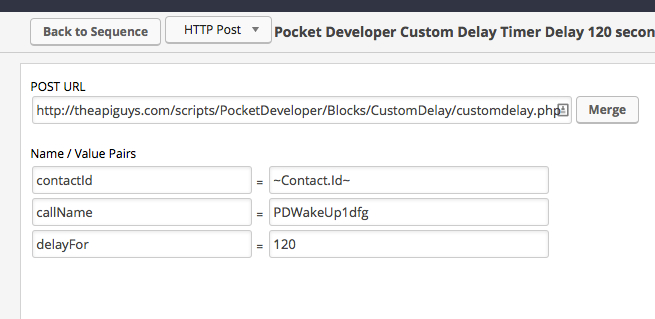
    • Configure an HTTP POST snippet named “Pocket Developer Custom Delay Timer Delay 120 seconds for GTW info to get back” as follows:

    Screenshot-82814-651-AM

    • POST URL => https://tag-2025.local/scripts/PocketDeveloper/Blocks/CustomDelay/customdelay.php
    • contactId => ~Contact.Id~ (you shouldn’t need to change this)
    • callName => PDWakeUp1dfg
    • delayFor => 120

    [wc_box color=”info” text_align=”left”]

    about-128Pocket Developer Custom Delay Timer is going to pause 120 seconds and then trigger the API goal following it to resume the campaign. The callName must match the callName in the API Goal immediately following this sequence.
    [/wc_box]

    3. Configure the API Goal, “PDWakeUp1dfg”, as follows:

    Configure Infusionsoft API Goal


    • integration => Your app name
    • Call Name => PDWakeUp1dfg

    [wc_box color=”info” text_align=”left”]

    about-128Pocket Developer Custom Delay Timer waits 120 seconds and then triggers this API Goal. That is why Call name must match in both places.
    [/wc_box]

    4. In the sequence named “Add Webinar Merge Fields”, create the following:

    Create Merge Fields Sequence

    • Configure an HTTP POST snippet named “PDev Any Date: Put pretty date in text field” as follows:

    Infusionsoft Merge Fields Date

    • POST URL => https://tag-2025.local/scripts/PocketDeveloper/Blocks/AnyDate/anydate.php
    • contactId => ~Contact.Id~ (you shouldn’t need to change this)
    • date => ~Contact._YourWebinarDate0~
    • format => l, F j, Y
    • saveTo => Contact._Yourwebinardatehumanform

    [wc_box color=”info” text_align=”left”]

    about-128The Any Date plug-in takes the date field populated by the GoToWebinar plug-in and converts that to a date like Saturday, August 30, 2014 for merging into emails. The format of the date is determined by the format value.
    [/wc_box]

    • Configure an HTTP POST snippet named “Pocket Developer Any Date Put time in text field” as follows:

    Put time in an Infusionsoft custom field

    • POST URL => https://tag-2025.local/scripts/PocketDeveloper/Blocks/AnyDate/anydate.php
    • contactId => ~Contact.Id~ (you shouldn’t need to change this)
    • date => ~Contact._YourWebinarDate0~
    • format => g:i A ET
    • saveTo => Contact._Yourwebinaretime

    [wc_box color=”info” text_align=”left”]

    about-128Notice this time Any Date takes the exact same date and converts it into a time, like 4:00 PM ET, and saves it in a different text field so it can be merged.
    [/wc_box]

    • Configure an HTTP POST snippet named “Pocket Developer Any Date: Put date in date field for field timer” as follows:

    Put webinar date in Infusionsoft field timer

    • POST URL => https://tag-2025.local/scripts/PocketDeveloper/Blocks/AnyDate/anydate.php
    • contactId => ~Contact.Id~ (you shouldn’t need to change this)
    • date => ~Contact._YourWebinarDate0~
    • format => Y-m-dTH:i:s/li>
    • saveTo => Contact._NextWebinarDate

    [wc_box color=”info” text_align=”left”]

    about-128This time we put the date in the required Infusionsoft format in a Date field so we can use it for a Field Timer. Field Timers do not work with DateTime or Text fields.
    [/wc_box]

    5. In the sequence named “Send Confirmation Email”, create the following:

    Send Webinar Confirmation Emails

    • Configure a confirmation email to be sent upon registration:

    KimDemo

    Notice the merge fields we populated in the previous sequence are now used in our email to make it dynamic.

    • Configure an HTTP POST snippet named “PDev Trigger API Goal: Trigger 1 hr before webinar” as follows:

    Universal Delay Timer

    • POST URL => https://tag-2025.local/scripts/PocketDeveloper/Blocks/TriggerAPI/trigger.php
    • contactId => ~Contact.Id~ (you shouldn’t need to change this)
    • triggerDate => ~Contact._YourWebinarDate0~
    • triggerTime => ~Contact._YourWebinareTime~
    • adjustment => -1 hour
    • callName => PDResumedhs3d

    [wc_box color=”info” text_align=”left”]

    about-128The Pocket Developer Universal Delay Timer plug-in will trigger the API Goal, named PDResumedhs3d, and resume the campaign, 1 hour before the webinar start. This cannot be done with both date and time dynamically currently in Campaign Builder.[/wc_box]

    6. Configure the API Goal, “PDResumedhs3d”, as follows:

    Resume campaign one hour before webinar

    • integration => Your app name
    • Call Name => PDResumedhs3d

    [wc_box color=”info” text_align=”left”]
    What does this do?Pocket Developer Custom Delay Timer waits until one hour before the webinar start time and then triggers this API Goal. Remember: the call names must match in both the POST Snippet and the API Goal.
    [/wc_box]

    7. In the sequence named “Send One Hour Reminder”, create the following:

    Send One Hour Reminder

    • Configure a reminder email to be sent one hour before the webinar begins using previously populated merge fields
    • Configure an HTTP POST snippet named “PDev Trigger API Goal: Trigger at webinar start time” as follows:

    Universal Delay Timer Configuration

    • POST URL => https://tag-2025.local/scripts/PocketDeveloper/Blocks/TriggerAPI/trigger.php
    • contactId => ~Contact.Id~ (you shouldn’t need to change this)
    • triggerDate => ~Contact._YourWebinarDate0~
    • triggerTime => ~Contact._YourWebinareTime~
    • callName => PDResumeSew22

    [wc_box color=”info” text_align=”left”]

    about-128The Pocket Developer Universal Delay Timer plug-in will trigger the API Goal, named PDResumeSew22, and resume the campaign at the webinar start so one last reminder email can be sent.[/wc_box]

    8. Configure the API Goal, “PDResumeSew22”, as follows:

    • integration => Your app name
    • Call Name => PDResumeSew22

    [wc_box color=”info” text_align=”left”]

    about-128Pocket Developer Custom Delay Timer waits the webinar start time and then triggers this API Goal. Remember: the call names must match in both the POST Snippet and the API Goal.
    [/wc_box]

    9. In the sequence named “Send Reminder At Start Time”, create the following:

    • Configure a reminder email to be sent as the webinar begins, using previously populated merge fields
    • Configure an HTTP POST snippet named “PDev Trigger API Goal: Trigger at 4 hrs after webinar start time” as follows:

    Create another universal delay timer

    • POST URL => https://tag-2025.local/scripts/PocketDeveloper/Blocks/TriggerAPI/trigger.php
    • contactId => ~Contact.Id~ (you shouldn’t need to change this)
    • triggerDate => ~Contact._YourWebinarDate0~
    • triggerTime => ~Contact._YourWebinareTime~
    • adjustment => +4 hours
    • callName => PDResumeD6ts

    [wc_box color=”info” text_align=”left”]

    about-128Remember the callNames can be anything. They just have to be unique and match the callName in the corresponding API Goal.[/wc_box]

    10. Configure the API Goal, “PDResumeD6ts”, as follows:

    • integration => Your app name
    • Call Name => PDResumeD6ts

    11. In the sequence named “Mark Attendance and Set Webinar Replay Link field”, create the following:

    • Configure an HTTP POST snippet named “PDev Any Date to Any Text: Update Webinar Replay Field” as follows:

    Use Any Date to set webinar replay field

    • POST URL => https://tag-2025.local/scripts/PocketDeveloper/Blocks/AnyDate/anydate.php
    • contactId => ~Contact.Id~ (you shouldn’t need to change this)
    • date => ~Contact._YourWebinarDate0~
    • format => Ymd
    • request => https://tag-2025.local/scripts/PocketDeveloper/Blocks/AnyText/anytext.php?textToSave=https://tag-2025.local/blog/{result}-webinar-replay/&saveTo=Contact._LinkToHandout
    • saveTo => Contact._MiddleName

    [wc_box color=”info” text_align=”left”]

    about-128This part is ninja. The “request” parameter chains two plug-ins together. In this case, Any Date Anywhere and Any Text Anywhere are chained. The request parameter uses the URL and a query string to pass the result of Any Date ({result}), to Any Text, in order to create a URL in a custom field that looks like http://yourdomain/blog/20140904-webinar-replay. That URL can be merged into the upcoming emails without having to change the campaign each time. You just have to create the replay page names to match and it will all be dynamic. We are using Contact._MiddleName to store the URL just to save custom fields, but you could put it in any text field.[/wc_box]

    • Configure an HTTP POST snippet named “PDev GTW Set Attended Did Not Attend Tags” as follows:

    Set webinar attendance tags in Infusionsoft

    • POST URL => https://tag-2025.local/scripts/PocketDeveloper/Blocks/GoToWebinar/gotowebinar.php
    • contactId => ~Contact.Id~ (you shouldn’t need to change this)
    • action => attendance
    • webinar => Your Webinar Id
    • absent => tag ID you want applied for those who were absent
    • present => tag ID you want applied for those who were present

    [wc_box color=”info” text_align=”left”]

    about-128This post uses the GoToWebinar plug-in to fetch attendance for your webinar and apply tags to attendees accordingly. This is one of two places you must manually update webinar ID for each webinar.[/wc_box]

    12. From the Mark Attendance sequence, configure two Tag Goals – one triggered by your Absent tag and one by Present tag – as follows:

    Create tag goals for GoToWebinar attendance

    13. In the sequence named “Attended Emails and Tags On The Fly”, create the following:

    Sequence Sends Thank You Email To Attendees

    • Configure a “thank-you” email for attendees:

    Put dynamic video link in email

    Notice the merge field for the video link we populated in the previous sequence is now used in our email to make it dynamic.

    • Configure an HTTP POST snippet named “PDev Tags On The Fly: Create Event Attended Category and Tag” as follows:

    Create attendance tags on-the-fly

    • POST URL => https://tag-2025.local/scripts/PocketDeveloper/Blocks/TagsFly/tags.php
    • contactId => ~Contact.Id~ (you shouldn’t need to change this)
    • tagCategory => Event Attended
    • tagName => %~Contact.MiddleName~ PD Launch Demo%
    • Do the same for the Did Not Attend Emails and Tags On The Fly sequence, substituting Event Not Attended for the tagCategory name.

    [wc_box color=”info” text_align=”left”]

    about-128We stored the webinar date, in the form of YYYYMMDD, in the Middle Name field, back in Step 11. Now we are merging that into a new tagName YYYYMMDD PD Launch Demo. If the tag category and/or name don’t exist, they will be created. The tags will be applied to contacts whether it already exists or had to be created. Note that ‘%’ is the wildcard symbol in Infusionsoft. [/wc_box]

    14. In the sequence named “Remove Attended/Did Not Tags and Wipe Stash Field”, create the following:

    Remove Attend Did Not Attend tags

    • Remove your generic Absent/Present tags so you can use them again if this contact attends another webinar:

    Remove tags

    • Configure an HTTP POST snippet named “PDev AnyText Wipe MiddleName Stash Field” as follows:

    Wipe the MiddleName stash field

    • POST URL => https://tag-2025.local/scripts/PocketDeveloper/Blocks/AnyText/anytext.php
    • contactId => ~Contact.Id~ (you shouldn’t need to change this)
    • textToSave =>
    • saveTo => Contact.MiddleName

    [wc_box color=”info” text_align=”left”]

    about-128Final step is to reset our “stash field”, MiddleName, back to blank. This is not necessary but we consider it good housekeeping. [/wc_box]

  • Webinar Registration

    Time converter at worldtimebuddy.com

    Webinars have been temporarily discontinued. Make sure you are on our mailing list if you want to be notified of new webinars and other learning opportunities.

  • Knowledge Base

    [wc_row][wc_column size=”one-half” position=”first”]
    [loopbuddy query_id=’13’ layout_id=’13’]
    [loopbuddy query_id=’14’ layout_id=’14’]
    [/wc_column]
    [wc_column size=”one-half” position=”last”]
    [loopbuddy query_id=’15’ layout_id=’15’]
    [loopbuddy query_id=’16’ layout_id=’16’]
    [/wc_column][/wc_row]

  • Use An Opportunity Or Appointment Date In An Infusionsoft Field Timer With Any Date Anywhere

    CHALLENGE:

    Infusionsoft Appointment You want to use a date or dateTime field in an Opportunity/Order/Task/Appointment to run a field timer in Infusionsoft Campaign Builder. These fields are not available as merge fields in Campaign Builder.

    SOLUTION:

    This tutorial and accompanying video gives you the step-by-step to use the Pocket Developer Any Date, Any Format, Anywhere Building Block to programmatically copy the date from the Opportunity/Order/Task/Appointment to a field in the Contact record so it can be used in the Field Timer. You can put the date in an unused Date field, such as Anniversary, or a custom field made specifically for the purpose of “stashing dates” copied from Opportunities, Orders, Tasks and Appointments.

    STEP-BY-STEP

    1. In Campaign Builder, where you want the Field Timer to run, create the following sequence:

    • an HTTP POST snippet
    • a field timer
    • whatever action or actions you want to occur when the field timer is triggered (for example, sending an email)
    • another HTTP POST snippet

    Date From Infusionsoft Appointment in Field Timer

    2. Open the first HTTP POST snippet. Configure as follows:

    • URL: http://yoursite.com/scripts/PocketDeveloper/Blocks/AnyDate/anydate.php (change path as necessary)
    • contactId => ~Contact.Id~ (no need to change this)
    • date => the Opportunity/Order/Task/Appointment field you want to use in the Field Timer (see Notes below)
    • format => YmdTH:i:s (this is the PHP format notation for all Infusionsoft date or DateTime fields)
    • saveTo => the Date field in the Contact Record (without tildes) where you will temporarily store the date while the Field Timer is running

    Screenshot_8_23_14__8_36_AM

    3. Open the Field Timer. Configure as follows:

    • Change the Contact Field to the Date field where you are stashing the Opportunity/Order/Task/Appointment date (e.g. Anniversary)
    • Change the dropdown below it from Next Occurrence to Use Year From Field
    • Configure Wait and Time to taste

    Screenshot_8_23_14__8_35_AM 2

    4. Configure emails triggered by field timer, etc

    * Remember you cannot put a Delay Timer in line with a Field Timer. If you plan to send a series of emails, after the Field Timer, put the emails in their own sequence with HTTP POST in Step 5 at the end.

    5. Open the second HTTP POST snippet. Configure as follows:

    • URL: http://yoursite.com/scripts/PocketDeveloper/Blocks/AnyDate/anydate.php (change path as necessary)
    • contactId => ~Contact.Id~ (no need to change this)
    • date => 09/09/2099
    • format => YmdTH:i:s (this is the PHP format notation for all Infusionsoft date or DateTime fields)
    • saveTo => the same Date field in the Contact Record (without tildes) as before

    * Once you put a date in a date field, you cannot make it blank again. We set ours to 09/09/2099 when finished just so nothing runs accidentally and we know that field is available for stashing.

    HOW TO SELECT A FIELD IN A SPECIFIC OPPORTUNITY/ORDER/INVOICE/TASK/APPOINTMENT/REFERRAL ETC

    These record types have not been available in Infusionsoft’s Campaign Builder because they are a one-to-many relationship to the Contact Record. This means each contact can and probably does have multiple opportunities, invoices, orders, etc. So the challenge is how to specify which one you want.

    We have create an Advanced Merge Field Notation, which allows you to specify a field in a specific one to many record for use in Pocket Developer Building Blocks:

    • In the Infusionsoft database, an Opportunity is referred to as a Lead. Our notation will take either Lead or Opportunity
    • Similarly, the database name for an order is Job. Our notation will take either Order or Job
    • You must always precede a custom field with a “_”. Stock Infusionsoft fields have no “_”
    • The merge filed notation used in the example (Opportunity._TestDateTime) assumes there is only one Opportunity. If there was more than one, it would pull TestDateTime from the most recent one
    • In cases where you know there are multiple records and you want to pull from one of them, Advanced Merge Field Notation allows you to use filters to select a specific record
    • The syntax for our notation is Table.Field.[FilterBy(…)][.OrderBy(…)][.Qualifier1[.QualifierN[…]]]. Parameters in brackets are optional.
    • A simple example would be Opportunity.NextActionDate.FilterBy(StageID:59). This would pull NextActionDate from the most recent Opportunity with Stage ID = 59. Opportunity.NextActionDate.FilterBy(StageID:59).Oldest would pull NextActionDate from the first or oldest Opportunity with Stage ID = 59
    • An example using an Appointment would be ContactAction.ActionDate.FilterBy(IsAppointment:1,ActionType:”Meeting”)

    You can read more about Any Date, Any Format, Anywhere and see more examples of its usage in the QuickStart Guide.

    You can read more about Advanced Merge Field Notation and see more examples of its usage in the Learning Center.

    FREQUENTLY ASKED QUESTIONS:

    Q. Where do I find the table and field names for Advanced Merge Field Notation?

    A. You can find the names of Infusionsoft tables and fields in the Infusionsoft Developer Resource Section under Table Documentation. You can find the names of your custom fields by going to Infusionsoft Admin Settings -> Add Custom Field -> Record Type -> Show Database Name

    Where to find custom field names in Infusionsoft

    Q. Why isn’t the field I want to use showing up in the Field Timer dropdown?

    A. There could be two reasons: It is not a Contact field or it is not a Date field. (Remember, DateTime fields do not work in Field Timer)

    RELATED ARTICLES AND POSTS

    [loopbuddy query_id=’12’ layout_id=’12’]

  • Programming Terms for Non-Programmers

    Action Set: a series of actions that are used together.  Generally call from an Action Dropdown menu

    Chaining : using results of one block in another block. The result of the initial Building Block is passed the a second block by using the Request parameter.

    contactID: This is the contact Id for the contact record where fields will be retrieved (if any) and where the result of the formula evaluation will be stored.

    Evaluation: the process of running the operations in a formula

    Formula: the written description of the variables you want to use and the operations you want done, in the order you want them done. An example formula would be a+b or (a+b)*z.

    Infusionsoft: a powerful small business automation tool

    Key/Value Pair: a parameter name and value passed to the server by a HTTP Post or URL query string

    Name/Value Pair: a parameter name and value passed to the server by a HTTP Post or URL query string

    One-To-Many: a relationship between records in a database where one record in one table could relate to more than one records in another table. For example, the relationship between Contacts and Opportunity is one-to-many because a single Contact could have multiple Opportunities.

    Operations: add, subtract, multiply, and divide

    Order of Operations: rules used to clarify the order expressions should be evaluated in a mathematical formula(see http://en.wikipedia.org/wiki/Order_of_operations)

    Query String: the part of a URL that contains data to be sent to the location identified in the url. A post url contains location information followed by a “?” and what comes after that is the query string.

    Request: This is the chained Building Block.. The merge field {result} can be placed anywhere within the URL to include the result of the first Building Block. This allows you to pass the value to another script/block.

    saveTo: This is the merge field where the result of the formula will be stored, such as _ArenaHandicap or
    _CustomField1. (Optional if using ‘request’)

    Variables: are the names, in the left side of a Key/Value Pair, that refer to the values being added, subtracted, multiplied or divided. In this block, you can have up to 52 variables: a – z and A – Z. For example, in the formula a + b = c, a, b, and c are all variables.

    “&”: goes between each Key/Value Pair in a url (concatentation)

    “?”: goes between the domain and the query string in a URL