Create Asana Tasks with HTTP Request from Infusionsoft Campaign Builder
Using our Pocket Developer HTTP Request plugin, you can create tasks in Asana directly from Campaign Builder. (Note that details about Asana’s API are available here.)
- To use Asana’s API, you will need to get a Personal Access Token from Asana. Follow Asana’s instructions to create your Personal Access Token. Be sure to copy the token and keep it in a safe place! The token begins with 0/ followed by a long alphanumeric string. (Note that anyone with access to Campaign Builder will be able to see this key to your Asana account. You could create multiple tokens for multiple purposes if you like, but to make things simple I just created one called “Infusionsoft Posts” that I use for all posts from Infusionsoft.)
- Creating an Asana task requires designating a project. To get a project’s identifying number, click on the project name in the left nav bar in Asana. In the url bar, you will see a number between backslashes, appearing just before /list. Copy this project number for later. (If you don’t want to designate a project, you can designate a workspace instead.)
- If you want to assign the task to someone, you will need their identifying number as well. Unfortunately there isn’t any url exposure of this information, but once you are logged in to Asana you can get a list of all the users in your account by going to https://app.asana.com/api/1.0/users. Look for the id number that corresponds with the person to whom you want to assign the task; the id number comes before the name inside braces. (You can similarly get a workspace id by using /workspaces instead of /users in the url.)
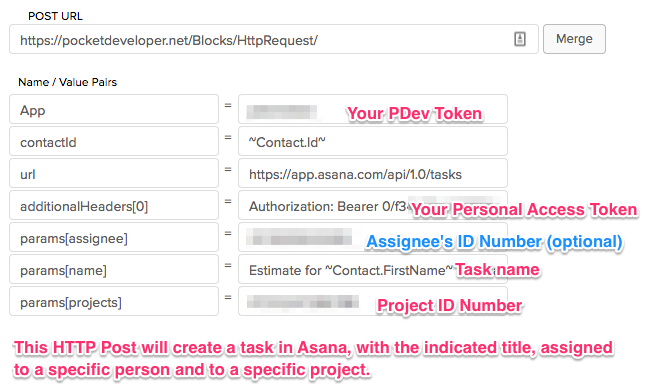
- In Campaign Builder, create an HTTP Post. The Post URL will be https://pocketdeveloper.net/Blocks/HttpRequest/ and the parameters will begin with
- App = YOUR PDEV TOKEN
- contactId = ~Contact.Id~
- url = https://app.asana.com/api/1.0/tasks
- additionalHeaders[0] = Authorization: Bearer INSERT YOUR PERSONAL ACCESS TOKEN
- params[projects] = YOUR PROJECT ID NUMBER (Note that you can assign the task to multiple projects by using a comma-separated list.)
- params[asignee] = ID NUMBER OF PERSON TO ASSIGN TO THE TASK (optional)
- params[name] = THE TITLE YOU WANT TO GIVE THE TASK (Note that you can include merge fields for dynamic data input.)
Now you are ready to publish your HTTP Post and test run it. (For more information on Asana task parameters you can set, see https://asana.com/developers/api-reference/tasks#create.)
From User List Box to Email
Infusionsoft’s User List Box type field can be handy. If you want to track which staff members are connecting with contacts in particular roles, for instance, you can create a custom field for each role. The User List Box type field will show you a dropdown list of all your Infusionsoft users for easy data entry in the contact record screen or an internal form or webform.
Unfortunately if you want to send automatic email notices to those staff members, the User List Box is basically useless. You’d need to have a separate custom field (in addition to the User List Box) to store the email. For many users, burning up so many custom fields is a problem.
With our Advanced Merge Field Notation, you don’t need to store user data in additional custom fields. You can drill down through the User List Box to get any readable data from the User table.
First, it helps to understand that while the User List Box displays a name, the data it actually contains is the user’s id number. This is the number you would see in the url if you went to edit the user data in Infusionsoft (Admin > Users > click user name). So what we need to do is get the email field for that user id from the User table.
To do so, we’re going to use the parentheses reference notation in Pocket Developer. You can get any specific record from a table by inserting the id number in parentheses after the table name and before the period. For instance:
Contact(12).FirstName
will get the contents of the FirstName field for contact id number 12. Similarly:
User(12).Email
will get the email address of user id number 12. Of course you won’t want to hardcode the id number each time you use Pocket Developer; instead you’ll want to merge in the User List Box field contents like this:
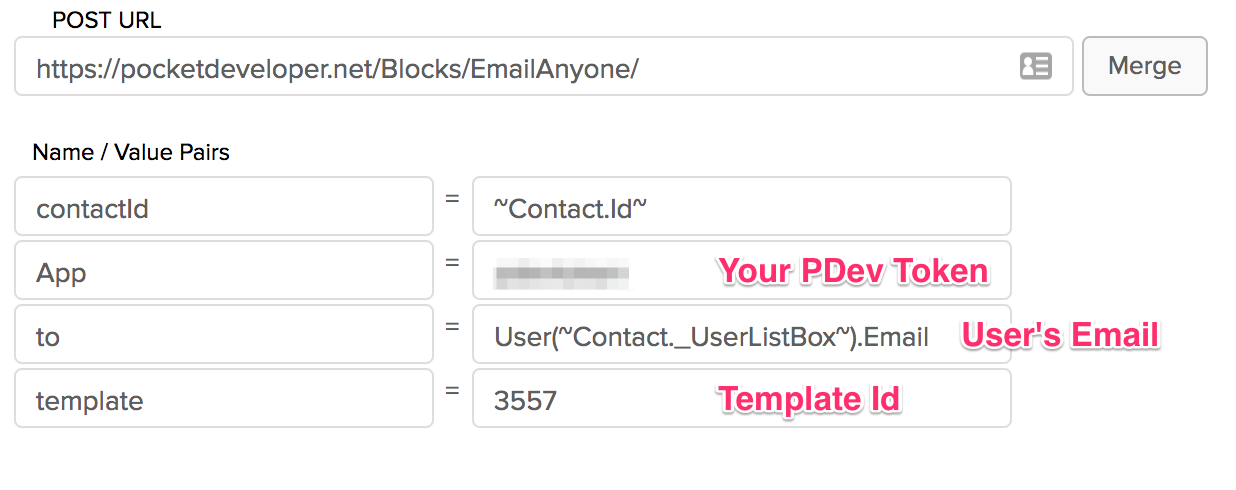
User(~Contact._UserListBox~).Email
You can use this to either temporarily get the email address and put it in an email field (e.g., EmailAddress2) or custom field, adn then send the email out using that field. Or, if you are using the PDev Email Anyone plugin, you can simply enter that text as the value of the “to” parameter:
Conditional operators for Pocket Developer: {if} {then} {else} Notation
Infusionsoft’s Decision Diamonds are fantastic. But sometimes they just aren’t sophisticated enough. You can set up complicated cascading diamonds, but it’s not much fun. So we thought we’d add the ability to do some conditionals in Pocket Developer plugins. To this end, we developed the {if} {then} {else} notation.
Let’s say you want to use AnyText to save something to a custom field, but only if another custom field has a value. For instance, maybe if the contact has a spouse, you want to put the number 2 in the “Number Registered” field. You could create an HTTP Post like this:
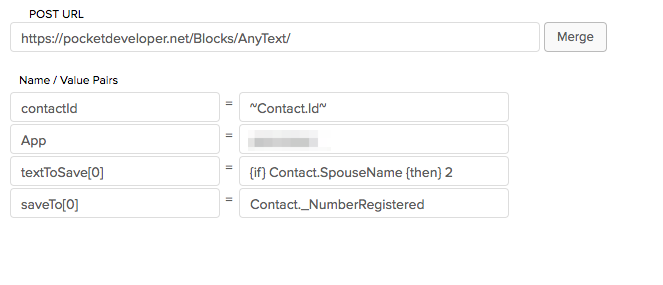
In the textToSave value, insert {if} followed by the field you want check for a value. Then insert {then} followed by whatever value you want to save to the saveTo field. This can be a number or text.
You can get more complicated by adding an {else} statement. Let’s in addition to entering a 2 when there’s a SpouseName, you want to enter a 1 if there is no SpouseName, you could make your textToSave value like this:
{if} Contact.SpouseName {then} 2 {else} 1
Remember, if you want to merge in data from a merge field, include the tildes:
{if} Contact.SpouseName {then} This person’s spouse is ~Contact.SpouseName~. {else} This person is not married.
(I’m not really sure why you’d want to do this, but you get the idea.)
Another way to use this conditional notation might be to set a default. For instance, if you are using AnyDate and you have set the date parameter to a field that is empty, the process will fail as a bad request (because you have given it no date input to convert or copy). You can fix this by using {else} to set a default date like this:
{if} Contact._FieldWithDate {then} ~Contact._FieldWithDate~ {else} today
With this value, if there is a date in the FieldWithDate field, it will be saved (to whatever field you designate in the saveTo parameter value), but if there is not date in FieldWithDate, it will set the date in the saveTo field to today’s date.
As always, we recommend thorough testing as you implement these advanced features. If you have any questions or run into any issues, let us know!
Automatically mark a task complete

Using Advanced Merge Field Notation (AMN) with Pocket Developer Any Any Date, Anywhere plugin in an HTTP Post in Campaign Builder, you can automatically mark tasks complete.
In order to mark a task complete, you need to set the CompletionDate field on the ContactAction table complete. (The ContactAction table is where tasks, appointments, and notes are stored. See Working with tasks, appointments, and notes for more details.) Doing so with AnyDate is as simple as setting the saveTo parameter to the value “ContactAction.CompletionDate”. However, this will ONLY work properly if the task you want to mark complete is the most recently created task, appointment, or note.
To reliably mark the correct task complete, we need to first “prefetch” the id number of the task and store it in a variable. We will then insert that variable in parentheses after the table name, so that when Pocket Developer retrieves the table it gets the entry with that specific id number, rather than the most recently created entry.
To start with, we want to tell PDev to get the Id number from the ContactAction table, so set the prefetch value to:
ContactAction.Id
Then we want to filter the table for just tasks that are not complete, so we’re going to use AMN in our prefetch value:
ContactAction.Id.FilterBy(ObjectType:Task,CompletionDate:~null~)
We’ve now targeted the most recently created incomplete task to mark as incomplete. (Well, we need to add that id number in parenthesis in the saveTo value, but more on that later.) This may be enough to reliably target the task to mark complete. But in the event the task we want is older, we can continue to add FilterBy criteria. Let’s say the task always has the Action Description “Feed Unicorns”, we can search for that specific description:
ContactAction.Id.FilterBy(ObjectType:Task,CompletionDate:~null~,

ActionDescription:"Feed Unicorns")
Note that the wildcard % is available, so if the task always starts with “Feed” but might be “Feed Unicorns” or “Feed Vampires”, we can use:
ContactAction.Id.FilterBy(ObjectType:Task,CompletionDate:~null~,

ActionDescription:"Feed %")
to get the most recent of either kind of task.
Once you have filtered for the specific task id, we just need to make sure the task id variable is used in the saveTo value. The variable is labeled in brackets after the “prefetch” name, so the complete prefetch name/value line will look like this:
prefetch[taskid] = ContactAction.Id.FilterBy(ObjectType:Task,CompletionDate:~null~,

ActionDescription:"Feed Unicorns")
The prefetch label can be anything, but must contain some alphabetic characters (i.e., not numbers only) and should have no spaces or special characters. In this case we’ve used “taskid” as a clear label of what the variable contains. We will insert this label in curly braces where we want the variable value to be used. In this case, we want to use it in parentheses after the table name, so as to identify the specific entity to change.
saveTo = ContactAction({taskid}).CompletionDate
We just have to set up the HTTP Post in the campaign where we want the task to be marked complete, and we’re done! Here’s what the HTTP Post looks like in the end:

- 1
- 2
- 3
- …
- 31
- Next Page »