Getting Started With The Infusionsoft API: The Missing Setup Guide

There is a reason the app of every single Infusionsoft Ultimate Marketer winner is filled with API scripts. With the API … if you can dream it, you can do it.

But let’s be honest. It can also be a little intimidating if you are not a programmer.

But, if you aren’t looking for a short cut and really do want instructions on how to find and install the Infusionsoft SDK, here you go … let us know if we can help.

[wc_box color=”go” text_align=”left”]
We can save you timeUPDATE: Since this guide was originally published, Infusionsoft has deprecated the version of the API covered in this tutorial. Because the old version is so much easier to set up, for a beginner, I have linked to https://github.com/ksnider/iSDK, in my Github account, so you can still use it. That said, if you are doing serious Infusionsoft development, and you want to future proof the application you are building, you should really use the new SDK, which can be found at http://developer.infusionsoft.com Disreagard mentions of Infusionsoft’s Github account and use my archived copy instead. -KIM (May 26, 2015).

[/wc_box]

VIDEO SUMMARY

How to set-up your system in order to use the InfusionSoft API.

Here are the steps:

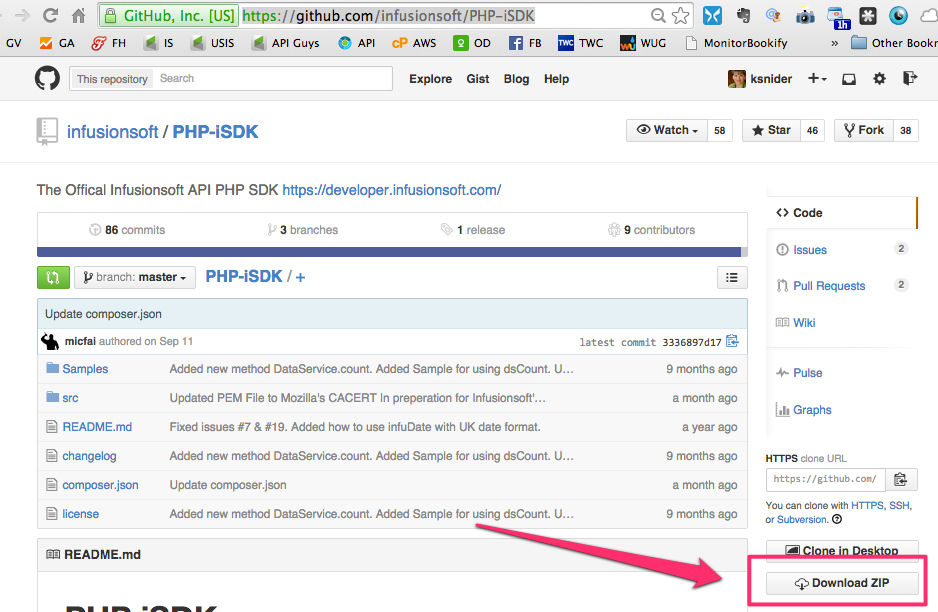
Step 1 – Download the iSDK

  • Get the Infusionsoft API PHP SDK from Github
  • Hit the Download ZIP button in the right sidebar
  • Download the SDK from Github

Step 2 – Get Your API Key

  • In the main menu of your InfusionSoft application, choose Admin -> Settings
  • Click Application on the left menu and scroll down near the bottom of the page. There you will see the encrypted key
  • Consult the Infusionsoft User Guide for more information on setting up your Infusionsoft API Key

How To Find Your Infusionsoft API Key

[wc_box color=”go” text_align=”left”]
Tip for newcomersTIP FOR NEWCOMERS: If you don’t have a key yet, you have to type in a phrase to act as the seed for the key and the key will automatically be generated. It doesn’t matter what phrase you use and you don’t need to remember it for future
[/wc_box]

Step 3 – Edit the conn.cnfg.php file

  • Unzip the downloaded file from Step 1
  • Open the src folder
  • Delete the phpinfo.php file
  • Open the conn.cfg.php file using any text editor. It will look like this:
  • [php]
    <?php
    $connInfo = array(‘connectionName:applicationName:i:APIKEYGOESHERE:This is
    the connection for applicationName.infusionsoft.com’);
    ?>
    [/php]

  • Change “connectionName” to your Infusionsoft application name
  • Also change both instances of “applicationName” to the Infusionsoft application name
  • Change “APIKEYGOESHERE” to your Infusionsoft API Key from Step 2
  • See tips below for help finding these values
  • Make sure you don’t inadvertently add any spaces or it won’t work

[wc_box color=”go” text_align=”left”]
Tip for newcomersTIP FOR NEWCOMERS: If you look at the URL when you are in your application, the app name is the portion of the URL that comes before “.infusionsoft.com”. So, for example, if my URL says hgy222.infusionsoft.com, hgy222 is the application name.
[/wc_box]

How To Find Your Infusionsoft Application Name

[wc_box color=”go” text_align=”left”]
Tip for Infusionsoft API code newcomersTOOLS: To get started, you can use either Notepad on Windows or TextEdit on Mac to edit your scripts. Turns out there is a trick to saving as a php file in TextEdit … you have to go to Format in the drop-down menu and choose “Change To Plain Text”. Then it will let you save with .php extension. Similarly, in Notepad, you have to set the “Save As Type” to All Files. If you do a lot of script-writing, you may decide to download a free code editor that is specifically suited for that purpose.
[/wc_box]

When complete, your conn.cnfg.php should look something like this:
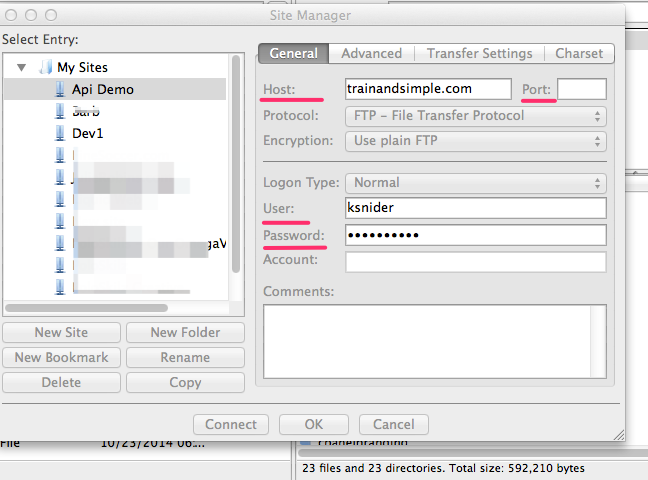
Infusionsoft API configuration to get started

Step 4 – Set-up FTP

  • For the host field we use the name of your FTP server
  • Username is the FTP username
  • Password is your FTP account password
  • You can leave port blank or use the port given in your server documentation
  • Hit Connect

[wc_box color=”go” text_align=”left”]
Tip for Infusionsoft API code newcomersTOOLS: If you don’t already have a favorite FTP client, I recommend Filezilla because it’s free and available for both Mac and Windows. I do not recommend using File Manager in cPanel. Too clunky and not enough information about the progress of your uploads, etc.
[/wc_box]

Configure FTP to upload Infusionsoft API scripts to your server

[wc_box color=”go” text_align=”left”]
Tip for newcomersTIP FOR NEWCOMERS: If you are unsure of any of these values, they should have been sent to you when you created your website hosting account.
[/wc_box]

Step 5 – Copy files to the server

  • Create a folder, in the root directory of your website, called “scripts”
  • Copy the xmlprc folder, isdk.php, infusionsoft.pem and conn.cfg.php to the scripts folder
  • Put the Infusionsoft SDK in your scripts folder

    Whoo hoo! Your server should now be set up for using the Infusionsoft API.

    Step 6 – Test it, to make sure everything works properly

  • In your text editor, create a new file and copy the following:
  • [php]
    <?php
    echo "Hello World! <br/>";
    require_once("isdk.php");
    $app = new iSDK;
    // Test Connnection
    if ($app->cfgCon("yourConnectionName"))
    {
    echo "Yabba Dabba Doo! You Are Connected To Infusionsoft …";
    }
    else
    {
    echo "Not Connected…";
    }
    ?>
    [/php]

  • Change “yourConnectionName”, on line 6, to your App Name (e.g. hff89622)
  • Save the file, in your scripts folder, as test.php
  • Go to your browser and enter the url of the file, for example http://yourwebsite.com/scripts/test.php and hit enter
  • If everything is working correctly, you should see the words “Hello World!” followed by “Yabba Dabba Doo! You Are Connected To Infusionsoft …”.

Step 7 – That’s it!

You are set up and ready to start rockin’ the Infusionsoft API.

If you have any problems or questions, please go to our API Learners Facebook Group. Or, if it worked perfectly, let us know that too so we can give you a high five!

Ready to take it a step further?

Check out our free 80/20 PHP class and all of the free Infusionsoft code samples in the Learning Center.

Comments

3 responses to “Getting Started With The Infusionsoft API: The Missing Setup Guide”

Leave a Reply

Your email address will not be published. Required fields are marked *